October 29,2020
Halloween Recipes To Freak Out Your Guests!
1. Witches' Finger Cookies
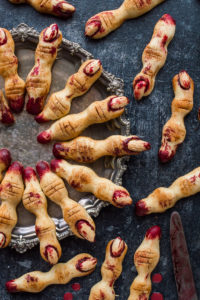
Image credits to Domestic Gothess
Ingredients:
- 225 g (2 sticks) softened unsalted butter
- 145 g (1 cup) icing (powdered) sugar
- 1 large egg
- 1 tsp vanilla extract
- 1/2 tsp almond extract
- 360 g (3 cups) plain (all-purpose) flour
- 1 tsp salt
- 1/4 tsp baking powder
- 110 g (3/4 cup) blanched almonds halved
- ground cinnamon
- red gel food colouring
- a little melted chocolate if needed
How to prepare:
- Place the butter and icing sugar in a large bowl and whisk with an electric mixer until just combined. Add the egg and vanilla and almond extracts and whisk again to mix.
- Sift together the flour, salt and baking powder and add to the bowl; fold it in until it forms a dough. Cover and place in the fridge for half an hour.
- Line a couple of baking sheets with baking parchment. Working with ¼ of the dough at a time, leaving the rest in the fridge, measure out ½ Tbsp quantities of dough. Roll each into a ball then roll out into a log shape.
- Press a blanched almond into one end to form a fingernail, then lightly flour your hands and use them to shape it into a knobbly finger shape. The cookies will spread a little in the oven, so you need to make sure that you make them quite thin – thinner than you want the cookies to end up. Use the back of a knife to make indentations in the knuckles to make them look more like fingers.
- Place the shaped cookies well-spaced apart on the prepared baking sheets then place them in the freezer for at least 20 minutes, until frozen solid (this helps stop them spreading in the oven).
- Meanwhile, heat the oven to 190°C/375°F. Bake the cookies for about 10 minutes, until pale golden. You will need to bake them in batches, keep the rest of the cookies in the freezer.
- Leave the cookies to cool on the tray. When you are ready to decorate, use a little melted chocolate to stick on any fingernails that have come loose. Rub a little bit of ground cinnamon into the creases in the joints to make them look dirty.
- Use a fine, food-only paintbrush to paint some red gel food colouring around the edge of the nails.
2. Jack O'Lantern Pumpkin Ice Cream
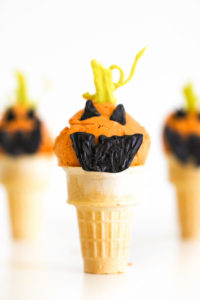
Image credits to Studio DIY
Ingredients:
- 1 cup milk
- 2 cups heavy whipping cream
- 5 egg yolks
- ¾ cup packed brown sugar divided
- ½ tsp salt
- ½ cup canned unsweetened pumpkin puree
- 1 tsp vanilla extract
- 1 tsp cinnamon
- ½ tsp ground ginger
- 1/8 tsp nutmeg
- 1/8 tsp ground cloves
- Optional: orange food colouring
- Black candy melts
- Green candy melts
- Ice cream cones
How to prepare:
- Combine the milk, heavy whipping cream, half the sugar, salt, pumpkin puree, vanilla extract, cinnamon, ground ginger, nutmeg, and ground cloves in a saucepan and bring to a boil over medium heat, whisking intermittently.
- While heating, combine the egg yolks and the other half of the sugar in a bowl and whisk to combine.
- When the milk mixture has come to a boil, pour ⅓ of it into the egg mixture and stir. Then pour another ⅓ and stir, and then the final ⅓ and stir.
- Next, pour the entire mixture back into the saucepan and heat, stirring constantly for 2 minutes, but do NOT let it come to a boil.
- Then, using a sieve, transfer the mixture to a clean bowl, allow it to come to room temperature, and then refrigerate for 1-2 hours.
- Optional: Add 6-9 drops orange (or mix red and yellow) food colouring if you could like ice cream to be more orange in colour.
- After the mixture is chilled, follow the manufacturer's instructions on your ice cream maker to make it into ice cream.
- Transfer ice cream to a freezer safe container and freeze overnight for it to further harden.
3. Monster Sushi
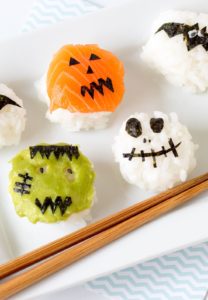
Image credits to Brit.co
Ingredients:
- 1 skinless, boneless fillet of good-quality raw salmon
- 2 sheets dried seaweed
- 1 Tablespoon rice vinegar
- 3 cups cooked sushi rice (cooked as per package instructions)
- 2 Tablespoons wasabi paste
- 1 teaspoon black sesame seeds
How to prepare:
- Use a sharp knife to cut the salmon fillet into thin slices. Then cut off the corners to create a rough, round shape.
- Use sharp, dry scissors to cut out lots of shapes for decorating the sushi. You’ll need small triangles for eyes and noses, uneven circles for eyes, zig-zags for mouths and hair, thin strips for smiles and scars, plus bat-shapes too.
- Mix one tablespoon of rice vinegar with 1/4 cup of cold water. Wet your hands with the mixture and scoop out a heaped tablespoon of sushi rice into your hand. Gently squash in a ball, then place on a board and flatten slightly.
- For the pumpkin design, layer a slice of salmon on top of a ball of rice. Use tweezers to place small triangles on the salmon for the eyes and nose, then use a zig-zag shape for the mouth.
- For the Frankenstein design, squeeze one tablespoon of wasabi onto a sushi ball. Dip your finger in the rice vinegar and use that finger to smooth out a face shape, being sure to leave two holes for the eyes. Add a zig-zag mouth and zig-zag hair, then use thin strips of seaweed to create a scar. Use black sesame seeds for the eyes.
- For the bat design, place the seaweed bat shape on top of the sushi ball. Take one grain of cooked sushi rice and cut in half. Use these rice pieces for the whites of the eyes. Use black sesame seeds for the pupils.
- For the monster face design, add two uneven circles for the eyes. Use two black sesame seeds for the nostrils and use thin strips of seaweed to create the mouth.
Having a Halloween party? Check out Oh's Farm Catering Halloween Party Set! Menu here: https://www.foodline.sg/d/22817/


")
")